
The Settings View at a Glance
Customize the way you and your organization utilize CXME.
Last Updated:What's in this article?
Let's take a look at the Settings view!
You can access the Settings view by clicking on your avatar at the top right, then click on Settings. The Settings view has various options listed under 4 different sections. Let's take a closer look at each one!
Your ability to adjust certain Settings depends on your Role & Permissions. Some options may not be visible to you.
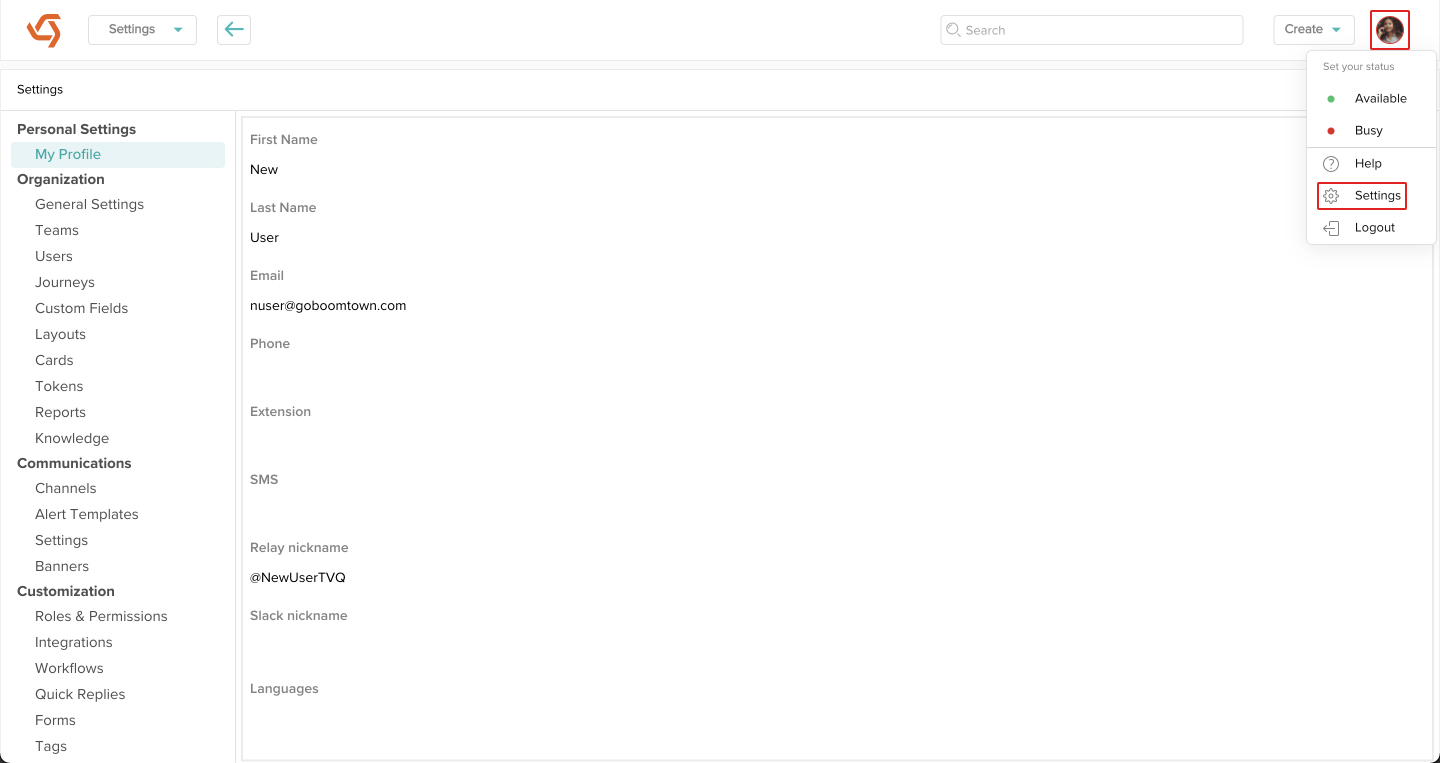
Personal Settings
Update your personal account information.
- My Profile - Edit your contact info, change your Role, update the Teams you are on, link your Google calendar, adjust the notifications you receive, set your time zone, and update your password.
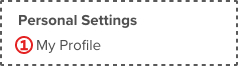
Organization
Make changes to the ways your organization interacts with CXME.
- General Settings - Edit your organization's contact info, adjust the ecosystem your organization is in, and access API (Application Programming Interface) information.
- Teams - Add, edit, or delete the Teams in your organization to group Users together.
- Users - Add, edit, or delete the individual Users in your organization.
- Journeys - Set up Journeys that can be added to Cases to track specific workflows.
- Custom Fields - Create custom fields that can be added to different layouts in the CX Manager.
- Layouts - Organize the fields Users see in the individual panels of the CX Manager.
- Cards - Make adjustments to the customizable section of different cards.
- Tokens - Create tokens to quickly add predetermined text to articles and avoid repetitive work.
- Reports - Add, edit, or delete reports based on your organization's database. (This is the same as the Reports view)
- Knowledge - Make changes to how your existing external libraries look, add new libraries, or delete libraries completely.
Communications
Make adjustments to the way your Users and Customers interact.

- Channels - Configure communications channels like chat, email, and text message that integrate with CXME.
- Alert Templates - Set up automated emails that get sent to Users or Customers after specific events.
- Settings - Edit the email domain of emails coming from the platform, set up email addresses for Teams to create new cases, and list any email addresses that forward to those Team addresses.
- Banners - Create custom banners to display in a Customer's chat window.
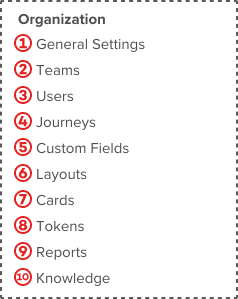
Customization
Adjust User capabilities and interactions.
- Roles & Permissions - Create roles with specific permissions to assign to Users in your organization that allow or restrict certain features.
- Integrations - Set up connections to CXME with third-party apps and software.
- Workflow - Turn on text redaction in conversations, adjust password policies, and more.
- Quick Replies - Create custom messages to quickly add predetermined text to communications channels and avoid repetitive work.
- Forms - Make different types of lists and surveys for Users and Customers to complete.
- Tags - Create different tags, categories, and more to keep things organized.