
The Article Body Toolbar at a Glance
Get creative with the content in your Articles.
Last Updated:What's in this article?
Article Body Toolbar
The content of your Articles can be updated using the toolbar built into the Article editor. Let's take a closer look at each section!

Text
Change the style and look of the text in your Article.
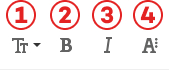
- Paragraph Format - Choose how you would like the text to be displayed in the Article. You can keep the text normal or choose different heading options to organize sections in your article. Text that is in Heading 1 format will also appear under the "What's in this article?" section of the external Article. Readers can click on each option to jump to that section of the Article. You can also display text as a block of code.
- Bold - Make any text stand out by making it bold. Heading formats are bold by default.
- Italics - Differentiate text by italicizing it.
- More Text - When you click on More Text, a new menu of options will appear below it. You can click on More Text again to hide them.
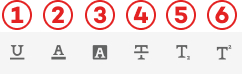
- Underline - All text will have a line underneath it.
- Text Color - Change the color of the text itself. Choose from a palette of color options or enter your own custom 6 digit hex color.
- Background Color - Change the color behind the text. Choose from a palette of color options or enter your own custom 6 digit hex color.
- Strikethrough - All text will have a line running through the middle of it.
- Subscript - Add smaller text to the lower right of existing text.
- Superscript - Add smaller text to the upper right of existing text.
Paragraph
Change how and where text appears in your Article.
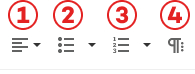
- Align - Choose how text is aligned in the Article. Text will be aligned left by default. You can choose from left, center, or right alignment. If you have multiple lines of text that want to span the width of the article while automatically adjusting the spacing, you can choose Align Justify.
- Unordered List - Create a bulleted list using different graphical shapes. You can choose different shapes by clicking the triangle next to the icon. Unordered lists will use solid black circles by default. You can use the tab key on your keyboard to create indented sub-lists.
- Ordered List - Create a numbered list. You can choose different alpha-numeric options by clicking the triangle next to the icon. Ordered lists will use natural numbers by default. You can use the tab key on your keyboard to create indented sub-lists.
- More Paragraph - When you click on More Paragraph, a new menu of options will appear below it. You can click on More Paragraph again to hide it.
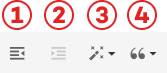
- Decrease Indent - If text is indented, you can decrease the size of the indentation by clicking this.
- Increase Indent - You can increase the indentation on the left by clicking this.
- Paragraph Style - Wrap text in a colorful banner to boost its emphasis for your readers.
- Quote - One or more vertical lines will be drawn to the left of your text to denote it is a quotation.
Rich Content
Use multimedia to further expand the content in your Articles.
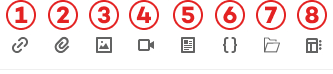
- Insert Link - Create text hyperlinks so readers can access other sites.
- Insert File - Add a file to the Article you are currently editing. Files will show up as a link that allows the reader to click on it to download the file.
- Insert Image - Add an image to the Article you are currently editing from your computer or from a specific image website address.
- Insert Video - Add a video or audio file to the Article you are currently editing . You can choose from a specific video website address, embedded code taken from the video website, or upload a file from your computer.
- Insert Article - You can add a link to any Article in your Libraries or choose to embed it in your the Article you are currently editing. The link or embedded Article will not be visible in the external Article if the reader does not have proper access controls or if the Article is in Draft status. The link and title of the Article being inserted will update automatically if they are ever changed.
- Insert Token - You can use tokens to replace frequently used text in Articles. After a token is created, it can be inserted into an Article so you do not have to type the same thing over and over again. Tokens can be created in Settings, depending on your Role & Permissions.
- File Manager - Upload files, images, and videos from your computer that you can use across multiple Articles in your Library. Once a file is uploaded, simply click on the thumbnail to insert it into the Article you are currently editing. You can also replace files and have the changes take effect in any Article that contains that file. You can also choose to delete the file just from the File Manager itself or also remove it from any Articles using it.
- More Rich- When you click on More Rich, a new menu of options will appear below it. You can click on More Rich again to hide it.
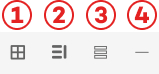
- Insert Table - Organize content into rows and columns by adding a table to your Article.
- Insert Tabs - Use tabs to show and hide specific information when clicked on.
- Insert Accordions - Remove clutter in your article by adding an accordion. This will keep content hidden until the accordion header is clicked on by the reader.
- Insert Horizontal Line - Separate sections of your Article by adding a horizontal line.
Code View & Miscellaneous
Edit the Article HTML (HyperText Markup Language) and much more.

- Code View - The Article editor is just a graphical interface for HTML code. If you know how to edit HTML, you can access the code for the Article by clicking Code View. Clicking on Code View again will take you back to the normal Article editor.
- More Misc- When you click on More Misc, a new menu of options will appear below it. You can click on More Misc again to hide it.
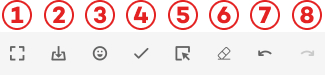
- Fullscreen - Make the entire editor the size of your browser window. Click on it again to return the screen size to normal.
- Download PDF - Create a .pdf (Portable Document Format) version of the Article to print or download.
- Emoticons - Add emojis to your Article.
- Special Characters - Quickly add unique text and symbols to your Article.
- Select All - Highlight all of the content in your Article so you can quickly update or delete it.
- Clear Formatting - Select some text then chose this option to remove any additional formatting on the text (e.g. bold, italic, text color, etc.)
- Undo - You can undo any updates you make to the article body by clicking this.
- Redo - You can click on Redo to go back to the changes you made before clicking Undo. If you do not undo any changes, this option will not be clickable.